The way people communicate online is rapidly changing. First, there were email and message boards. Then social networks swept in. The most recent development is messaging applications. People are spending more time than ever before in Facebook Messenger, WhatsApp, Viber, Kik, and the like. In fact, recently the global use of top messaging applications surpassed the use of the top 4 social networks, and the gap has been growing (see chart).

Source: BI Intelligence
Simultaneously, people are downloading and using fewer mobile applications. The ones that are being downloaded and used more than others are messengers (surprise, surprise!), as can be evidenced by almost a 400% increase in the use of Messaging and Social apps in 2016:

Source: ComScore

Source: Flurry Analytics
So what should businesses do in this shifting landscape of online communication? How does one establish a firm digital presence and reach potential customers who are spending most their time in messenger apps? How do you reach buyers at the Awareness Stage of their journey if consumers are in messenger apps?
The answer is chatbots. Chatbots are pieces of software that communicate with humans through messenger apps. In other words, chatbots live in the same platforms where most people present online spend their time. Chatbots (bots) can help you get things done or be entertained and don’t require downloading a separate application - all is done through a familiar messenger window. Many bots utilize Artificial Intelligence engines that allow them to offer highly personalized and conversational experiences to their users.
Technological advances and rapid progress in the AI technology have made building a bot a breeze nowadays. Using a free platform like Chatfuel you don't need to have any tech background or possess any prior experience in building bots (or creating anything else online - like websites for that matter).
Some of the brands that have built bots using Chatfuel:

Chatfuel is a do-it-yourself solution that gives anyone the ability to build a full-featured chatbot for Facebook Messenger in a matter of minutes. Using a simple drag-and-drop interface you can start experimenting with your own bot and become an expert at it within a very short time.


Chatfuel’s “What You See is What You Get” bot-builder:

What can you gain by building a chatbot and allowing it to communicate with your audience in Facebook Messenger? Why is it better than relying on the familiar social network + website + email strategy for promoting your business online? In addition to aforementioned reasons, here are a few points to consider:
- Content delivered in messenger has open and read rates of up to 90%+
- Compare that with 20-30% tops in email
- Quality bot experiences exhibit 65%+ user retention rates in the 3rd week
- Can your website match this?
- Messages sent through a bot appear on the users’ locked phone screens - same as messages they receive from friends
- Say goodbye to algorithmical news feed posts in social networks that most your followers don’t even see
- Audience segmentation tools in bots will help you create truly personalized and relevant experience for your followers
- One-to-one conversations at scale!
You can use Chatfuel to create any conversational experience in Facebook Messenger. Think of personalized content delivery, marketing, e-commerce, trivia, etc - sky is the limit!
To give you some ideas, take a look through this list for examples of chatbot experiences built on Chatfuel (it’s best to use a mobile phone with Facebook Messenger application to try them out).
Before you begin building your bot, define its purpose, target audience, decide what the bot’s personality/ voice is going to be, and start mapping out the conversation flow.
Define the purpose of your bot
The first order of business is to decide what your bot is going to do. What is the main reason for its existence? Although you can create extremely rich and powerful bot experiences that feature numerous functionalities, it is best to focus on the main thing that the bot does and experiment with additional features later as you gain your user base:
- Is your bot going to serve as a marketing/lead generation vehicle?
- Do you intend on sending regular content pieces to users?
- Will you provide some entertainment functionalities such as trivia?
- Are you going to sell items through your bot and have users pay right in the Messenger?
- What will the main call-to-action be and why should users care?
Ask yourself these types of questions and decide on where your bot’s focus and goals will lie. This way, the first version of your bot is going to come together much quicker and will be of good quality. Trying to “stuff” too many functionalities into the bot from the get go is often like biting off more than you can chew. The good news is that iterating with a tool like Chatfuel is extremely easy and does not require a lot of time. So adding more features down the road will never become a problem!
Define your target audience
Like with any new project, defining the audience for your offer is a key task. You want to be clear what your bot’s target audience is and what they would want to see the bot do. If you already have a good definition of your target audience from another project (i.e. if you own a business), then you might be one step ahead. Obviously, a 16-year-old schoolgirl from Manhattan and a 65-year-old farmer from Texas are likely going to be interested in completely different things. Keeping your target audience in mind is going to play a significant role in building out your bot experience. One way to define your target audience is by outlining your core buyer persona, and if you’ve done this, think about where your bot lies in the buyers journey to frame your call-to-actions in the bot, as well as the messages and context your bot will project to help solve problems in that specific stage of the buyer's journey.
Pick the type of bot you’re going to build (AI, scripted, both, etc)
By the type of bot, we mean to what extent you intend to rely on the AI engine in serving up the bot flow to the user. With the term ‘chatbots’, users’ expectations usually lead them to believe that the bot is going to be able to have a response to every question or comment they type into the messenger application. But in reality, most bots are not that smart since setting up an advanced artificially intelligent bot takes longer and requires more effort. The opposite of an artificially intelligent bot is a scripted bot, that uses buttons, menus, and pre-defined answers (also referred to as ‘rails’) to guide the user through its flow. Most bots combine both types in one experience - you offer enough ‘rails’ to your users to keep them focused on the primary functionality of the bot, but also leave some room for free-typing inputs from users. This chart from Facebook shows the spectrum that lies between relying on purely conversational flow to purely visual guided user interface:

Programming your bot to respond to typical small talk and chitchat (including stickers and emojis), as well as most-expected requests from your specific target audience is generally a good idea. Thankfully, doing that with Chatfuel’s AI setup is a breeze. On the other hand, there is always an option to take away the free text input altogether and rely exclusively on guided experience.
Pick the voice/ personality of your bot
Picking a distinct personality for your bot and staying consistent with it helps build trust with your user base and establishes clarity. Just like in any conversation in a messaging application, interacting with your bot should feel as natural as possible. So as long as your bot has a clear personality, it makes the experience much more enjoyable and engaging for the users. But be careful to not overdo it! If your business/brand already has an existing personality and tone of voice - stick with it. Your existing user base is already familiar with your style and (hopefully) trust has been established between your brand and your customers. If that’s the case, there may be no need to create a whole new personality just for your bot that might take longer to build up all over again. Be mindful of what your target audience expects and be consistent with how your bot communicates. Most importantly - never pretend that your bot is human - you won’t win this game (at least at present)!


Map out the conversation flow
Although your bot’s contents are going to be constantly evolving as your bot experience grows, it is best to map out at least the high level of your bot’s initial conversation flow. Remember - the bot experience is not as reliant on Graphical User Interface (GUI) like a mobile app or a website. Your bot is having a conversation with every user, and each step of the conversation leads the user down the path (or ‘conversation flow’). Many bots have focal points, such as main menus to which the user can always come back to adjust their path or shift topics. The main points to remember is that conversations should never have dead ends; the user should always be given access to help of some kind. It is also a good idea to offer users an overview of the main functionalities of the bot and make them aware of options available to them in the menus (more on this in the next chapter). This helps set the right expectations and will assist in avoiding user frustration. Using a free tool like Coggle should give you enough power to map out the initial flow.
PRO TIP: Avoid dead ends and provide access to help
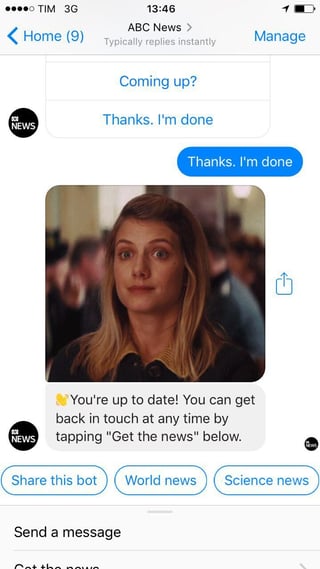
When constructing your bot flow, make sure to avoid “dead ends” in the conversation. In other words, every response from the bot should leave the user with a clear understanding on where to go from that point on. Either the message itself should give the user some direction, or the bot should offer other options with the use of buttons and quick replies. Consider how the ABC News Australia responds when the user is done reading all the news for the day:
The user is left with a whole slew of options allowing them to jump back into the flow any time.
The same goes for providing access to help. If a user is not sure what to do next, or what the bot does, giving them the option to tap “Help” is always a good idea. This generally means adding a Help section in the Persistent Menu of the bot (it’s that sliding up and down area at the bottom of the Messenger screen), which is always available to the user.
Notice how in addition to simply suggesting a help guide, the bot also gives users the ability to share feedback. We’ll show you how to do this in the next chapter!

Refer to this helpful design guide from Facebook for other tips on constructing conversational interfaces in bots. It’s a short but powerful resource that is great reference for any bot creator.
Once you’re done with the planning stages of your bot experience and have defined your persona, goals and call-to-action, you can move on to the build process. This is where the real fun begins. Where the rubber hits the road, so to speak. To get started on your first bot using Chatfuel, follow these simple steps:
- Go to www.chatfuel.com and click ‘Login’ in the top right corner

- Log in using your Facebook credentials and follow the prompts give Chatfuel the necessary permissions for building bots
- Once you get to the main dashboard screen, click “Create a Blank Chatbot”

- ...which will take you to the following screen:

This is your new bot’s build interface. The navigation panel is located on the left. We will go through each tab, starting with “Build”.
A bot’s structure is made up of Blocks. A block consists of one or more pieces of content (text messages, images, video, etc) that the bot sends to the user at one time. Here’s a sample block, which consists of an image and a text card:

To create a new block, click “+” in the Bot Structure:

Name the newly-created block:

And add content cards to it - text, gallery, image, etc by utilizing the “Add a Card” bar:

You can connect two blocks by creating a button in one block, and linking it to the other block.

In the sample Welcome Message block above, the “Great!” button will take a user to a block titled “Great”.
PRO TIP: Designing the Welcome Message and Default Answer
Welcome Message and Default Answer are typically the first two blocks you are going to build in your bot. Here are a few tips on how to construct them in the best possible way:
Welcome Message
- Greet the user by first name. In order to do that, use the left curly brackets where the user’s first name should appear.
- Explain what the bot does - it is usually a good idea to explain how the bot works and what it does during the first onboarding interaction with the user. This sets the right expectations and provides clarity for the user.
- Number of interactions - based on the historical data of the most successful chatbot experiences built on Chatfuel, they concluded that a number of interactions that the user goes through in the initial onboarding flow is directly correlated to the user retention. The ideal number of interactions is between 5 and 10. Make sure you engage users in a fun exchange from the get go in order for them to remain bot subscribers going forward.
Default Answer:
- Create several Default Answers and randomize the bot’s responses by making the use of the “Go to Block Plugin”. Place this plugin into the Default Answer block and set it up to randomly redirect to a few other blocks with different versions of the default answer.
- Provide an out for the user in every instance when they get the Default Answer from the bot. Add buttons that will take the user to the Main Menu, or the Help section of the bot. Remember - avoid dead ends!
- Emojis - make use of emojis! When the user gets hit with the bot’s Default Answer it means they are not receiving the response they expected. So keep it light, and try to make it fun.


Once you’ve added a few blocks and connected them together, you can test the existing part of the flow by clicking the “Test This Chatbot” button in the top right corner of the screen:

As you put together your bot flow and its appearance for the end user, it’s good to keep in mind the design best practices that we discussed earlier.
PRO TIP: Utilizing the “User Input” plugin to collect information from your users.
User Input plugin in Chatfuel gives you the ability to collect relevant information from your users (such as email, phone number, feedback, etc) by expressly asking them to provide it in the bot flow. All this information can be sent to you via email, and also saved by the bot to be utilized in user segmentation later. Note this is not the only way to collect information about your users, but more on that later.
For example, in addition to simply suggesting a help guide to those users who are looking for help within the bot, give them the ability to share feedback.
Access the plugins menu by clicking “+” in the card menu:
Select the User Input Plugin:
In the plugin window, enter the text that the bot will send to the user prompting them to provide feedback and other relevant info, such as email, phone number, etc. User responses will be saved to User Attributes, which you can title any way you wish (“feedback” and “email”) in the example below (more on User Attributes here). Validation function in the plugin helps ensure that the response which the user is providing matches the intended request (i.e. when an email is asked for, the bot verifies that a valid email address is provided).
Once the user responses/inputs are saved into the attributes, they need to be sent to the bot admin. This is where the Send Email plugin comes in handy. Place it right under the User Input plugin in the same block and fill out the details of the email title and where it needs to be sent. You can construct the email body in whichever way you prefer, as long as you add the same attributes that were set in the User Input plugin above.
Now, every time a user chooses to send you feedback through the bot, you will get an email containing their comments.
If instead of receiving an email containing the information saved to User Attributes you would like to pass it to a 3rd party service such as a Google Sheets (again, think of automating info gathering for marketing purposes), you can do so with the use of Chatfuel’s integration with Zapier and the JSON API plugin. Here’s a step-by-step guide on how to do that.


Adding content such as text, photos, videos, GIFs, etc is really simple using Chatfuel. Everything can be added with a click of a button. However, you should pay attention to what the graphic content such as images and GIFs look like and how long it might take them to load in a conversational interface. Follow this Asset Guide when putting the bot flow together. Make sure you are consistent throughout and that the experience looks uniform and professional.
This helpful asset guide from Chatfuel will serve as a good reference as you are putting together assets and copy for your bot.
PRO TIP: Utilizing reference parameter links for different bot entry points
Your bot does not have to begin its conversation with a new user with the same message every time. In fact, depending on your needs, you want your bot’s flow to be different. Consider the following instances:
- You are using different subscription sources and want to track them separately
- You are running a marketing campaign with a special offer and want the bot to focus on that topic only
Basically, sometimes you need to customize the entry point for your users and you need the ability to track that entry point. Enter the REF param links. At the top of each block, you will notice a small green button titled “LINK”, which displays a message when you hover over it
Clicking that button will bring up a dialogue box which will allow you to set the REF parameter of your choosing for this link. You can also copy this URL and use it behind a button on your landing page or online ads to drive people to this specific block in your bot
You can track the traffic for each REF link on the Sources graph under the Analyze tab:


Setting up Artificial Intelligence rules
“Set Up AI” tab enables you to add conversational responses to your bot. This is done by adding individual AI rules - one for each intended phrase or request. For example, you want your bot to respond with a specific message (or multiple messages) every time someone says “Hi”, “Hello”, or something similar.
Under the Set Up AI tab, click on the Add AI Rule button:

Then add a set of phrases with similar intent that a user would be expected to type in:

And add the responses that you’d like your bot to pick from. Although you can add just one response, it is best to consider randomizing from a set of several responses to keep the experience fresh in case the same user enters the intended phrase more than once:

In addition to replying with just text, you can set up a rule to reply with a content block. As you already know, blocks may contain rich graphic content like images and GIFs in addition to text:

For each rule, enter a many similar user phrases as reasonably possible to help the AI engine to respond with more accuracy. For those instances when your bot does not recognize the user’s input and can’t match it with a specific AI rule, set up your bot’s Default Answer under the “Build” tab.

Again, it’s important to keep in mind that conversation dead-ends should be avoided. Therefore, make sure that your Default Answer gives users options to get help, go to the main menu, etc.
Note that you can also set up multiple randomized Default Answers with the use of the “Go To Block” plugin.
PRO TIP: Routing the users with the “Go To Block” plugin
The “Go To Block” plugin is a powerful feature that helps you create a more flexible and complex bot experience. With the help of this plugin you can route users through the bot flow based on specific attributes, or randomly. Here’s how you would use this plugin to randomize the Default Answer in your bot, to keep things fresh every time the bot does not know how to respond to the user.
In the Default Answer block, add the “Go To Block Plugin” by clicking “+” in the card menu.
Pick the “Go To Block” plugin from the menu
In the plugin window toggle “random”, and start entering the names of the blocks where each of your Default Answer versions is going to be located. If you don’t have those blocks created yet, the plugin will suggest that you create a block with the name you are typing. To add a new block in randomized order, click “Add Random Block”.
Ultimately you want to have the plugin populated with several blocks, to which your users will be redirected randomly each time the Default Answer block is triggered by the bot.
For more on how to use the “Go To Block” plugin for routing and filtering users through the bot flow, see this article in Chatfuel’s help guide.


Setting up Broadcasts
The ability to proactively reach out to your bot’s users with a broadcasts message, is, perhaps, the most powerful feature of a messenger bot. Once a user has interacted with your bot, and given he has not subsequently blocked the page to which the bot is attached and not deleted the conversation with the bot from his Messenger, you can reach that user at any time with a broadcast message.
This functionality is especially important for internet marketers. For reasons such as much higher CTR, personalized bite-sized messages, and instant notification on the user’s locked phones screen, supplementing your email marketing strategy with chatbots should at the very least be considered. More on this here and here.
The “Broadcasting” tab allows you to set up different types of broadcasts, depending on the content and the purpose of your message.
Deliver Your Message Now - a simple functionality allowing you to send a message to your users right away. Notice the interface of the Broadcast function - similar to the “Build” tab, it allows you to add text, images, GIFs, etc to your broadcast message.

Sequences - similar to drip marketing, you can set up messages that will be delivered to users after a specific time period passes from a pre-set trigger. Triggers you can use are “First interaction with the bot”, “Last interaction with the bot”, and “User Attribute”. Playing around with this feature can tremendously improve your current email drip campaigns by personalizing them in ways only possible with the use of chatbots.
PRO TIP: User Attributes and User Filter in broadcasts
User Attributes are a key tool that sets bots apart from other digital experiences and instruments like websites, e-mail and/or mobile applications. User Attributes are personal tags or labels that are attached to every user interacting with the bot. The bot (and the bot admin) memorize those tags and can use them later for the purposes of personalizing the bot experience, routing users to specific bot flows, and segmenting the audience. User Attributes include the user’s name, gender, timezone, their preferences and likes, their location, etc.
To learn more about how these attributes can be generated and accessed to create powerful and personalized bot experiences, please read this article from Chatfuel’s help.
User Filter in Broadcasting
When setting up your broadcast messages, you will notice a green button titled “User Filter”.
User Filter allows you to apply various attributes to the broadcast message to ensure that only the specific set of users receive its contents. It’s the ultimate message personalization function to ensure the content relevancy to the target audience.
Clicking User Filter will bring up a dialogue box where you will be able to select the available attributes to apply to the broadcast.
Once the required set of attributes is picked, the tool will tell you how many users match this set and will be receiving the message you are about to send.
Use this tool to ensure to strategically segment and target your audience with specific broadcast messages to maximize their impact.


Schedule for Later - does just that - allows you to schedule your broadcast message to be sent at a specific date and time. You can also set up broadcasts to be delivered on a regular recurrent schedule. This works well with RSS Feeds that are regularly updated and you want your subscribers to receive the latest updates regularly.

Autopost From External Source - allows you to set up your broadcast to be send immediately once some external source (such as a social network feed, a Google Sheet, or an RSS Feed, etc) is updated with new content. To add the source from which you want to send the broadcast, click on the “+” in the “Add a Card” bar:

And pick from one of the available plugins, which are integrated using IFTTT or Zapier services:

Once you’ve picked your source, the setup wizard will take you through the necessary steps to activate your autoposting.
PRO TIP: Broadcasting Best Practices.
You want to be mindful with how you use the broadcast functionality in your bot. It’s generally wrong to completely ignore it. On the other hand - abusing it may also not be a good idea. Every audience is going to be different in terms of their tolerance of message frequency. Based on Chatfuel’s internal research across tens of thousands of bots built on their platform, sending at least 1 broadcast message per day tends to have the most positive impact on the audience retention and engagement. Furthermore, it seems as though serving up relevant content to your subscribers up to 2 times per day (if you have this much content to share) will not have any negative impact on your users’ LTV.
If you intend to send regular broadcasts on specific topics, make sure you get the express consent from the user to receive these types of messages. It’s best done as part of the bot’s Welcome Message. Here’s how the TechCrunch bot does it:
Once the “OK, what else?” button is tapped, the bot assigns the user a specific User Attribute which confirms their consent to receive a digest of trending stories once a day.
It is best to review Facebook’s official policy regarding different types of broadcast messages and how they should be used. Following this policy will ensure that your bot does not get banned for sending messages that don’t conform to the regulations.

Setting up in-bot Payments
You can set up your bot to accept payments for your goods and services right in the Messenger window. There are two options for collecting payments that Chatfuel allows you to pick from:
- Stripe Worldwide Payments - the option that should be used if you target customers worldwide, and/or if your business is located outside of the United States.
- Native Messenger Payments - only works for U.S.-based businesses with U.S.-only customers at this time.
To activate the payments functionality in your bot, under “Configure” tab go to Payments and click “Run Wizard”:

Then pick the payments option that fits your business:

And go through the prompts to set up the payments functionality. Once you’re done with the set up, you’ll be able to use the Buy button in the gallery cards, where individual items for sale can be featured.
After you’ve set up your payments account, you can start adding goods and/or services for sale using gallery cards. To add a “Buy” button to a gallery card, select the appropriate button type and enter all the relevant information about the item, such as price, tax, shipping charges, as well as what type of details you would want to receive in an email about each user when they make a purchase in your bot:
 |
 |
Designing and building your chatbot is only part of the job. Driving users to it is a whole other task that requires specific efforts in order to make sure that the experience you create finds its audience. Unlike websites and social networks pages, bots require specific techniques in order to make them more discoverable by potential users.
“Grow” tab in Chatfuel’s dashboard is an ever-evolving set of tools and tips on how to grow your bot’s audience. We will go through a few of them.
Messenger’s Discover Tab
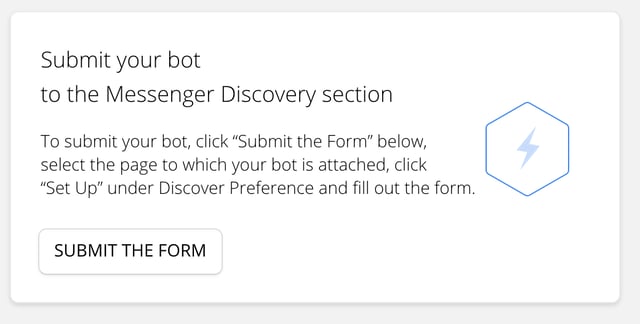
Facebook started rolling out the Discover Tab in its Messenger update in June of 2017. This functionality is called upon to increase discoverability of bots in Messenger. Therefore, it is very helpful for every bot built for Messenger to appear under the Discover tab so that Messenger users can find it.
In order for your bot to appear under the Discover Tab, you need to submit a form to Facebook. This can be done through the corresponding submission widget under Chatfuel’s Grow tab.
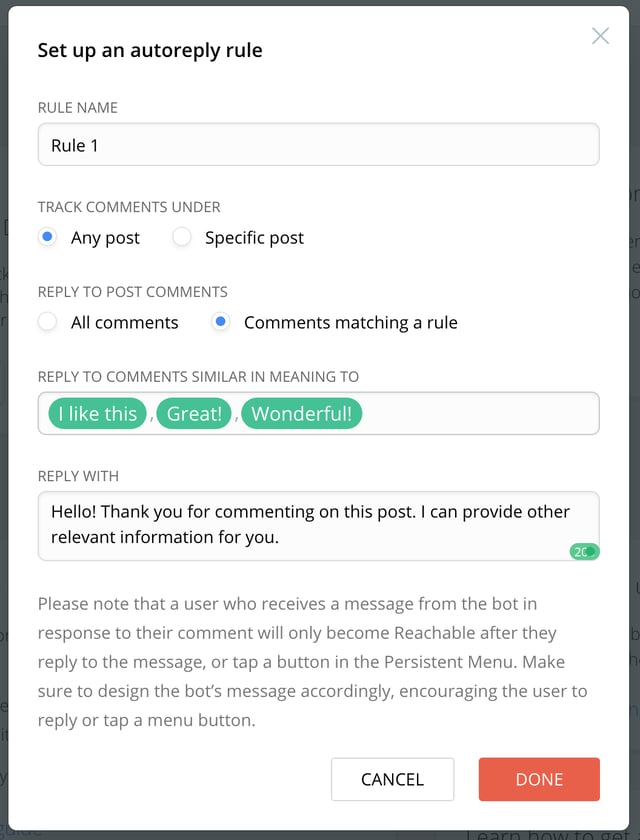
Acquiring users from Facebook post comments
Another way to drive new users to your bot is to set it up to respond to those people who are commenting on posts on your Facebook page. Chatfuel’s research has shown that this is one of the most effective ways to gain users from ads or pages with high post engagement. So they have developed a tool for that.
Click on “Add Rule” in the corresponding widget

And then follow the wizard to set up a rule for the bot to respond to a comment. Any rule can be adjusted to respond to all comments to all posts, or just to specific comments (similar to the AI rule setup) on specific posts.
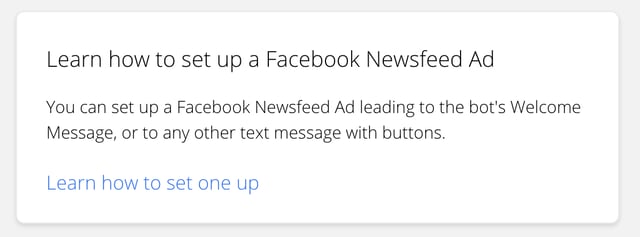
Setting up paid newsfeed ads for bots
Perhaps a familiar way to drive traffic through social networks is a paid newsfeed ad. With the emergence of bots in Messenger, Facebook introduced the ability to set up newsfeed ads that drive people directly to a conversation with a bot in Messenger. Setting up your ad can be confusing to begin with. Furthermore, Chatfuel has analyzed different types of ad setups and created a guide that will help you get the most bang for your buck when setting up a newsfeed ad for your bot. To access the guide, click on the link in the corresponding widget and follow the instructions!
Use of Messenger Codes
Much like QR codes, Messenger Codes are scannable graphics specific to the Messenger app that connect the physical world with the online experience in Messenger. Every Facebook page, as well as the bot connected to that page, has the ability to generate a code, which will take any user to the bot experience if scanned with the camera in Messenger.
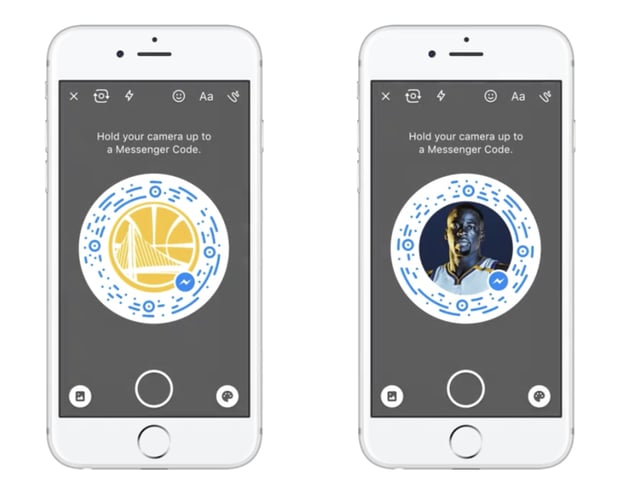
In Messenger platform 2.0 Facebook made accessing the code-scanning functionality of the camera really simple. All you do is launch the camera while in the Messenger app on your mobile device, tap and hold the finger, and the scanning feature gets activated. You can then point it to a Messenger code posted anywhere in the physical world - on a wall, on a TV screen, or on a billboard for that matter, and the corresponding Messenger bot starts chatting with you!
Messenger codes are a great way to increase the discoverability of your bot and gain new users. Parametric functionality means that a single bot can have several codes with different reference parameters behind them, offering users different entry points to the bot. For example - scanning one code may start your bot from the regular welcome message, while another one will open up a special offer section with a completely different flow for the user.
To find out how to get a code for your bot, click the corresponding link under the “Grow” tab and follow the directions.
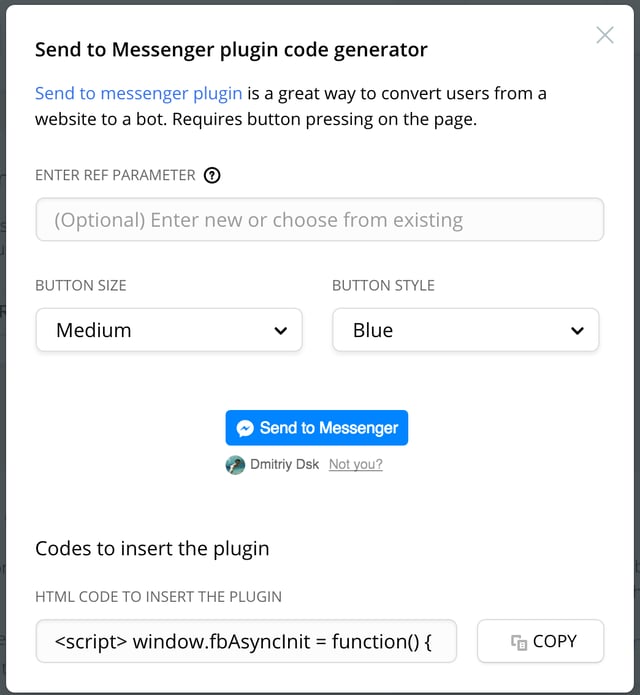
Convert your website visitors to your chatbot subscribers
Another effective way to leverage your existing channels to drive more users to your bot is by placing a button or a plugin on your website or landing page leading users to your bot. Chatfuel has built an integration with Facebook’s “Send to Messenger” and “Checkbox” plugins into their platform. The widgets can be found under the Grow tab and will help you generate code to be added on your web page to place either a button or a plugin there.
Send to Messenger button code generator:
Checkbox plugin code generator
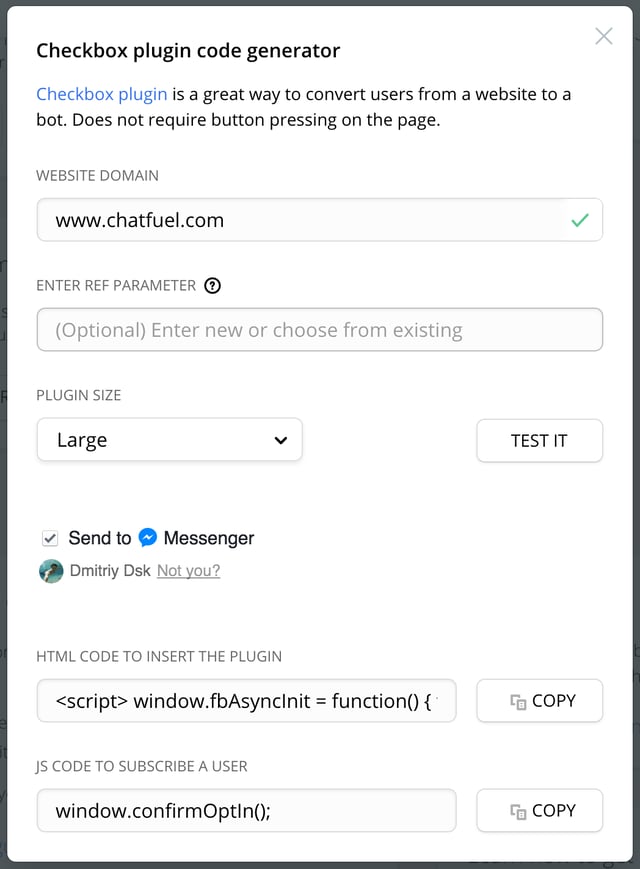
While the Send to Messenger Plugin requires a button to be clicked by the user, there are ways to set up the Checkbox Plugin to subscribe your website visitor to your bot without having them click any buttons. Talk about removing any friction from getting new subscribers.
In addition to the tools that you will find under the “Grow” tab, be sure to check Chatfuel’s guide to chatbot promotion. This document has been put together using the industry’s best practices and successful experience of other bot admins, and is constantly updated with the most relevant info.
When starting a chatbot project, it is important to track your bot’s performance to evaluate its effectiveness. We’ll help you identify simple metrics that will enable you to set specific goals for your chatbot, and track them using Chatfuel’s Analytics module.
A successful bot experience:
- Helps users address their needs
- Makes users want to return
- Gains a large user base
Tracking your chatbot performance using Chatfuel’s Analytics is really simple. Here are the main metrics to pay attention to:
Total Users
The simplest and most direct measure of your bot’s performance. This metric allows you to understand whether your bot has traction and shows you how this experience compares to your other channels. Number of total users also tells you how effective your chatbot promotion efforts are.

Conversion rates
See the “Popular Blocks” table. Evaluating popular blocks helps measure how relevant your bot’s content and functionality is to your user base. In other words, how effectively your bot helps your users address their needs. This table enables you to see how far your users are getting through the bot flow, or down the funnel (whichever you prefer to call it). Compared these numbers to your other channels such as a website, email, mobile app, etc.

User Engagement/Activity
This metric is important because it helps identify the types of content/ experiences that result in your audience returning to and interacting with the bot. Seeing what type of content/ functionality results in higher user engagement will enable you to offer more of the same to your users, to keep them coming back for more. Refer to:
User Activity graph

- Broadcast User Engagement – read and button click/tap rates - note that this data is contained under the “Broadcast” tab and provided for each sent broadcast message.

- Conversations - adjusting AI rules
Data contained under the “Analytics” will also help you analyze and adjust your bot’s Artificial Intelligence rules. Widget titled “Popular User Inputs” will show you what phrases users type into the bot most frequently. You can then adjust your AI engine’s responses accordingly.

Along with “Popular User Inputs” it is also good to keep an eye on the “User Inputs Not Recognized by AI” table. If you see that similar types of requests listed here are being typed in by users frequently, you may want to set up your bot’s AI engine to provide responses. Your users are looking for answers to those requests.

Other metrics
Utilize other metrics and data available under the “Analyze” tab as applicable to your specific case (direct sales numbers, sources of traffic, etc).
You will see that Chatfuel’s platform also offers integration possibilities with a few 3rd party chatbot analytics providers. Give those services a try if the data contained in the dashboard is not enough for your use. You can dive deeper into the conversations and data using the integrations with those services. They each differ somewhat from each other, so test drive them all if you wish and pick the one you like - or use all of them alongside each other.
Taking a close look at your bot’s performance will help you deliver a better experience to your users, and help retain your existing audience and gain new followers. We encourage you to pay close attention to your performance metrics and keep adjusting your bot flow and functionalities accordingly.